Tuesday, November 29, 2011

Luke and I had fun today making a snowman scene while working on mathematics. I saw this idea in the Mailbox Magazine for Teachers. It is a simple, fun activity that any preschooler would love! All you need is a sheet of white paper with the number 1-12 (or 10, whatever you are working on) written along the bottom, flashcards corresponding to the numbers on the bottom of the paper and Bingo Dot Markers (found at the Dollar store).

Luke drew a flashcard out of the stack and practiced sounding out the number word as best he could. I obviously had to help him on most of them since they are phonetically ridiculous. haha! After he figured out the correct number, he found it at the bottom of his page and put that many dots above the number to build his snowman. Do this until you are done with every flashcard.

Then simply add some details to your snowmen with markers.


Happy Crafting!!
I often link my posts up to THESE great Link Parties.
Tuesday, November 29, 2011 0
Monday, November 28, 2011
Congratulations to The Bishop Family, Comment #14! You are the winner of the Ultimate Box of Projects from Craft Project Ideas. I will be emailing you!

A big thanks to all those who entered and continue to support I Heart Crafty Things. I love you! :)
Monday, November 28, 2011 0
This Giveaway is now closed.
Doing the chores can be such a bore, especially when I have to wear those unattractive, yellow gloves....
Ever since I had my first child nearly 7 years ago I have been battling hand eczema. Those baby wipes are a killer on the hands! It's one of the things in my life that I hate talking about and honestly, can be pretty embarrassing at times. Because I have sensitive hands, wearing gloves while cleaning is a MUST. Whenever I have to slide on those ugly, yellow gloves I can't help buy feel like an old, worn out housewife. hahaha!
But recently The Organized Parent sent me these fancy Gloveables...

No more worn out housewife here folks! Now I slip these beauties on and I'm pretty sure there's a twinkle in my eye while I stand over at the sink washing dishes. I might even happen to belt out an old favorite tune and move my hips while doing the housework now. I can finally put on some gloves and don't have this ugly yellow aura surrounding me. If I haven't mentioned it yet, I LOVE these gloves! And I'm pretty sure every Mother and housewife you know would feel the same way about them. Christmas is coming up you know, hint hint! :)
They have a variety of cute styles to choose from.

The Organized Parent wants you to experience the euphoria of ridding yourself from those ugly yellow gloves too, so they are giving away one pair of Pink Zebra-striped Gloveables to one lucky I Heart Crafty Things Reader. They have a value of $14.95, and I'm telling you, if you want to add more excitement in your life while cleaning your house, these gloves are right up your alley!
HERE IS HOW TO WIN: Make sure you leave one comment for each entry. Please make sure your email is on your profile, or include it with your comment. Only US residents are eligible for this giveaway!
- Leave a comment telling me which style of gloveables is your favorite.
- Follow I Heart Crafty Things via Google Friend Connect.
- Like The Organized Parent on Facebook.
- Follow I Heart Crafty Things on Twitter.
- And for kicks and giggles, leave a comment telling me what chore you dread the most for one extra entry.
Coupon Code:
If you want to purchase a pair of these adorable Gloveables for yourself or for all the beautiful Women in your life, The Organized Parent is offering a 15% discount through November 30th. Click on the banner in my sidebar to be directed to their site and use coupon code 21510 at checkout.
Giveaway will close Thursday, December 1, 2011 at 10:00 am MST!
***The Organized Parent provided me with a pair of Gloveables free of charge in exchange for reviewing their product, but all opinions are my own.
Saturday, November 26, 2011
I hope everyone in the U.S. had a Happy Thanksgiving! I finally feel recovered from all that food (haha) and I'm excited to be moving on to Winter crafts at our house. We picked up "Snow Music" by Lynne Rae Perkins at the library last week. I knew it would be a perfect story for us since we've recently had our first snowfall.

The illustrations perfectly depict a snowy winter scene. A little boy opens his door to see the snow that had fallen over night and his dog quickly escapes. As the story follows the boy trying to find his dog, it illustrates the sounds of snow through animal tracks, tire tracks, etc. It was pretty fun to have my kids imitate the sounds with me and they were engaged the whole time during the story.
We decided to imitate the book cover by creating our own snow globe scene. To complete the snow scene in our globes we painted it with glitter paint to depict the snow falling down. Here is mine below.

I simply cut out a shape for the globe out of white card stock paper and the boys used pencil to first draw their scene. After coloring it with crayons, we got out the water colors to paint the background of our scenes.


After the water colors were dry, we painted iridescent glitter paint all over the globe. It gave it a shiny texture like glass and the glitter created a beautiful snowy scene. I realize it's hard to see all the glitter in these pictures so they don't do the craft justice, but they really turned out so sparkly and beautiful! I cut a base out of brown paper to add to the bottom of our globe.


This project has really got us excited about the Winter season. We are going to do one more craft with this book so you'll have to stay tuned in the next couple days.
Happy Crafting!
Dont' forget to Enter the Ultimate Box of Projects Giveaway. It ends 11/28 at 10:00a.m. MST
Linking up to THESE Great Linky Parties.
Saturday, November 26, 2011 0
Wednesday, November 23, 2011

I opened up the box and the first thing I thought was how they certainly got the "Ultimate" part correct in their title! My 4 yr old could hardly contain his excitement upon inspecting the box and there was definitely some inpatient jumping up and down as I opened it up to take a peek inside. :)
Here is a sample of some of the fun projects we have already completed out of the box.
The boys insisted on making these fun clay animals first. They turned out so darling!


Keep in mind they made these completely on their own, without any help. I was glad they didn't need any assistance since I was having so much fun making a creation of my own out of the clay. (What can I say, I don't know how to stay out of the FUN!)

The next day Luke had fun creating the Life on the Farm scene. Below is a picture before he started. He was able to place the stickers wherever he wanted on the background to create his own scene.
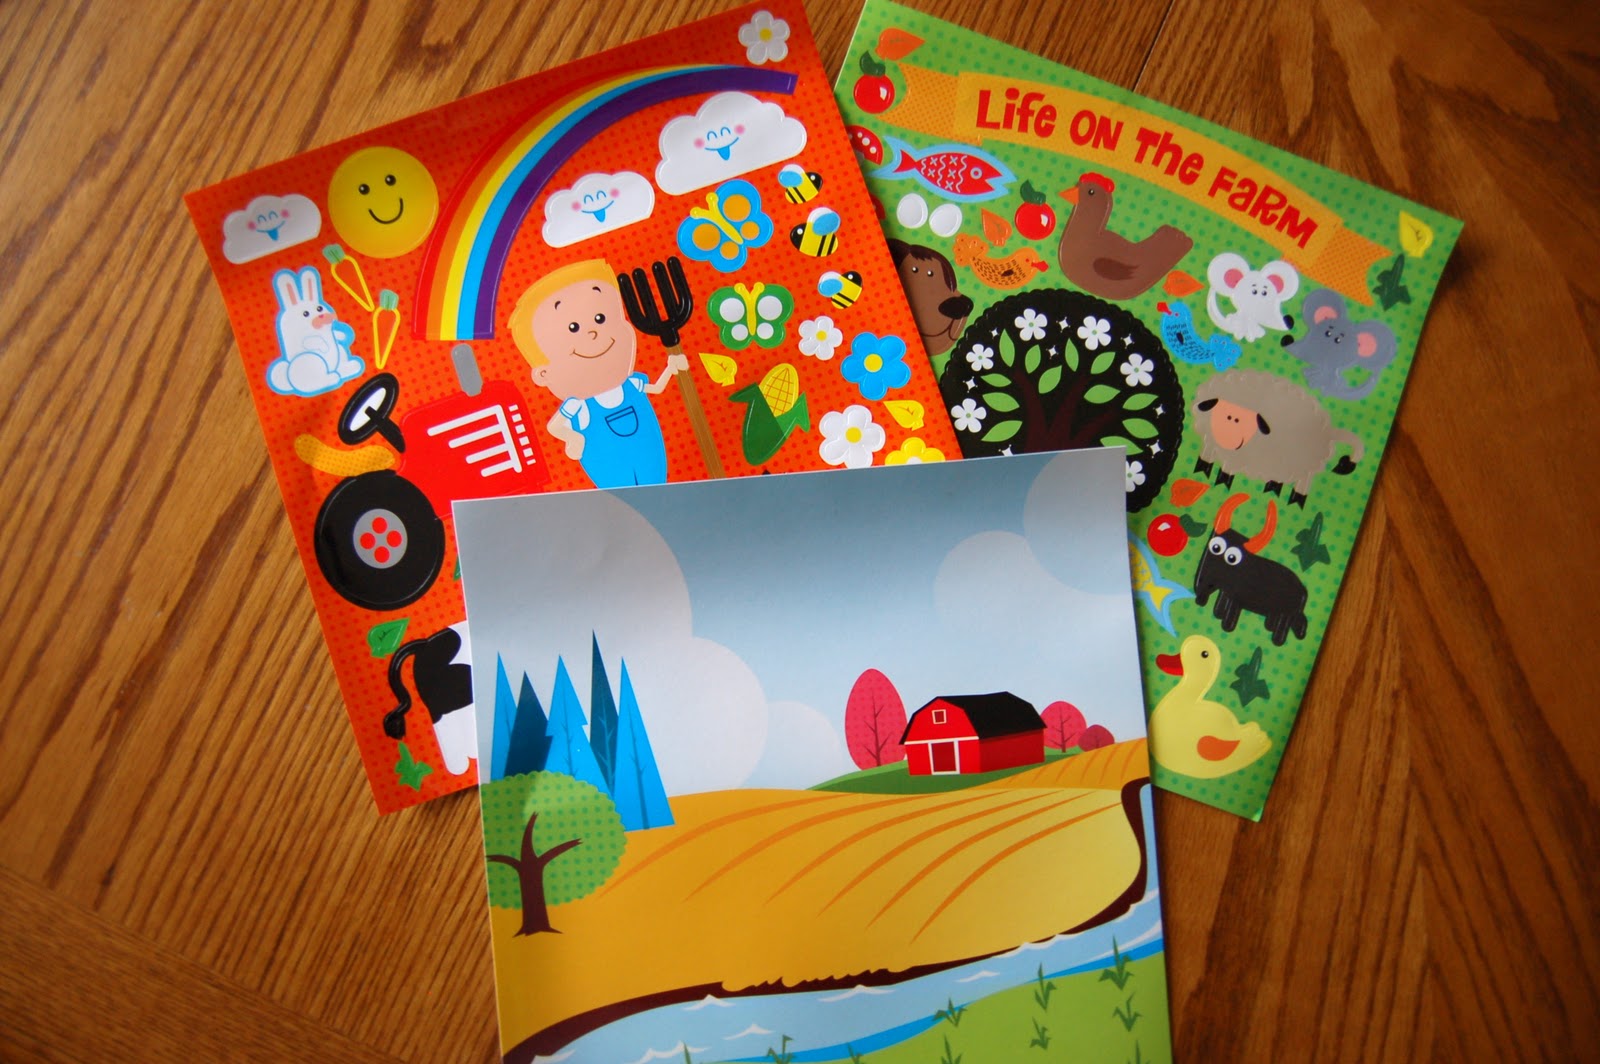
Here is his completed scene. He seriously spent an hour making his scene just right and it now hangs proudly on our refrigerator.

Since I have an adorable niece celebrating a birthday this week, Luke also took it upon himself to make her a beautiful necklace out of the foam beads.

I loved that he could practice some fine motor skills while crafting! :) And he has a handmade, beautiful gift for his cousin.

These kits would make wonderful Christmas presents! My 4yr old has asked me every day to get the box out to do another project. The best part is everything easily stores right in the box it came in....I know, isn't that magnificent?! You can purchase these fun kits at any Wal-Mart.
Since Craft Project Ideas wants you to be in on all this fun too, they are giving away one Ultimate Box of Projects to one lucky I Heart Crafty Things reader.
HERE IS HOW TO WIN: Make sure you leave one comment for each entry. Please make sure your email is on your profile, or include it with your comment. This giveaway is open to U.S. residents only (apologies to my international readers).
- Leave a comment telling me what is your favorite kind of pie. (I've totally got Thanksgiving on the brain!)
- Follow I Heart Crafty Things via Google Friend Connect.
- Stop by Craft Project Ideas and check out their 'Made by Me' Junior Products. Then come back and leave a comment of which kit is your favorite.
- Like Craft Project Ideas on Facebook or follow on Twitter.
This giveaway will close November 28, 2011 at 10:00a.m. (MST). I will notify the winner by email shortly after.
Wednesday, November 23, 2011 0
Sunday, November 20, 2011

If I'm being completely honest with you, I have to tell you that my husband does not fully appreciate my love for this book. Hahahaha! I placed a hold on it at my local library and waited for what seemed like an eternity for it to become available. When I picked it up at the library I sat in the passenger seat (husband was driving) and couldn't help myself but open it up and read it out loud to him, laughing the entire way through it. Let's just say he was less than amused. :) But you know, I just can't help myself!
I saw the most fun idea from The Mailbox to make a scented pumpkin craft and I instantly knew it was PERFECT to go along with this book. It is a rather silly kind of craft but my preschooler has absolutely adored it!

I got out a paper plate and had Luke paint the inside of it pumpkin orange. While the paint was still wet, we sprinkled some gold glitter in it and some pumpkin pie spice all over the plate.

After the paint was dry, we glued square pieces of brown tissue paper around the outside edge of the paper plate to create the crust. You wouldn't even know it was fake because with the pumpkin pie spice sprinkled on, it smells like the real thing!

It's been sitting on the kitchen counter for days now and every time the boys walk by they have to stop to take a big whiff and exclaim how excited they are to eat the real pie on Thanksgiving Day!
Happy Crafting!!
Don't forget to Enter to win some awesome digital scrapbooking software HERE. You can even use it for blog design so you don't want to miss out!
Linking up to THESE Great Parties.
Sunday, November 20, 2011 0
Saturday, November 19, 2011

I am very excited to tell you about My Memories and their digital scrapbook software today. Their software allows you to create scrapbook-style pages from your computer. They have tons of free templates to choose from or you can start from scratch to design your own templates.
The favorite thing about this software is how versatile it is in creating a variety of different projects. Not only can you create your own scrapbook, but you can create your own greeting cards, invitations, calendars, blogger background designs and headers, and so much more! The software even has an option to create a slide show with music! You can have your pages printed and bound in a book, print them from your own computer, or save them as a JPG file and use them digitally.
Every year for Christmas I make a calendar as a gift for my siblings and I typically use an online company. My biggest complaint about those companies is how unappealing their background pages are. When I heard about this scrapbook software and it's ability to create your own custom calendars I squealed with delight! I have been working away at it the last couple days and I've completed my own calendar pages. Here is a little sample.


I found the software so simple to use and navigate through. I used their Help section a couple times and found it really useful for any questions I had. Although the software came with tons of free backgrounds and embellishments, I decided to purchase the "It Happened This Year" pack from their website to create my calendar pages. I was so surprised with how much I received with the pack for only $3.59. I have bought scrapbook supplies in the past and know how pricey they are, so imagine how pleased I was to get so much for only a couple dollars. Plus, they had pages of Free packs you can download without having to purchase anything.
Now that I've been introduced to this software my list keeps growing with ideas of how to use it. I KNOW you will feel the same way about it!
THE GIVEAWAY
My Memories has been so gracious to give away one software package to one lucky I Heart Crafty Things Reader. I know, aren't you excited?!!
HERE IS HOW TO WIN: Make sure you leave one comment for each entry. Please make sure your email is on your profile, or include it with your comment.
- {Mandatory} Visit My Memories and leave a comment here telling me what your favorite digital paper pack is.
- Follow I Heart Crafty Things via Google Friend Connect.
- Follow I Heart Crafty Things on Twitter. (I don't post much on there so I promise I won't fill your feed!)
- Follow My Memories on Facebook.
- And for kicks and giggles, leave a comment telling me what your favorite thing to eat on Thanksgiving is, and I'll give you another entry. :)
Saturday, November 19, 2011 0

We have a tradition in our home making these adorable apple turkeys for Thanksgiving. My Mom made them every year with me and my siblings growing up and I've decided to continue that on with my kids.


I'm guest posting over at One Artsy Mama for her {Our} Home for the Holidays Series and I'd love it if you'd stop by and check out how to make these adorable little creatures! :)

I also wanted to mention that Amy from One Artsy Mama is the darling gal who designed my sidebar labels for me. You know, the cute rainbow colored ones with the heart on them! :) I asked her to make them for me but didn't even know quite what I wanted. She seriously had them designed in like 10 minutes and emailed to me. I gasped with delight when I saw them and said, "Oh my gosh, it's like she read my mind!" She's pretty amazing like that! So if you are one of those non-designer bloggers like me, you should definitely consider her for any of your designing needs. :)
Ok, what are you waiting for??? Go click over to read about those darling Turkey Apples!!
Happy Crafting!!
Thursday, November 17, 2011


Thursday, November 17, 2011 0
Wednesday, November 16, 2011
After our Thanksgiving Reenactment we made some Thankful Turkey Puppets so the kids could display some things they were thankful for this year. They were so simple to make and the kids have had a grand ol' time playing with them saying "Gobble, Gobble".

We just used the kids cut-out handprints for the feathers, some googly eyes, a yellow triangle for the beak and I cut out a waddle from a red foam sheet.

Andy is thankful for church, going to first grade, Mommy & Daddy, computer games and Thanksgiving.

Luke is thankful for Thanksgiving dinner, Netflix (haha), the turkey crafts we made, that he can go to preschool and his toys.

I am thankful that God blessed me with children. I feel my greatest strengths and weaknesses have come from having children and I am grateful that they continually give me a desire to to better and to be better.
Happy Crafting!!
Linking up to THESE Great Parties.
Wednesday, November 16, 2011 0
Tuesday, November 15, 2011

I am sooooo excited to be participating in The 13 Crafts of Christmas over at Lines Across My Face today. Look at these fun Christmas Picture Frames we made...


Tuesday, November 15, 2011 0
Monday, November 14, 2011

We spent some time yesterday afternoon reenacting the Thanksgiving story after reading these fun books.


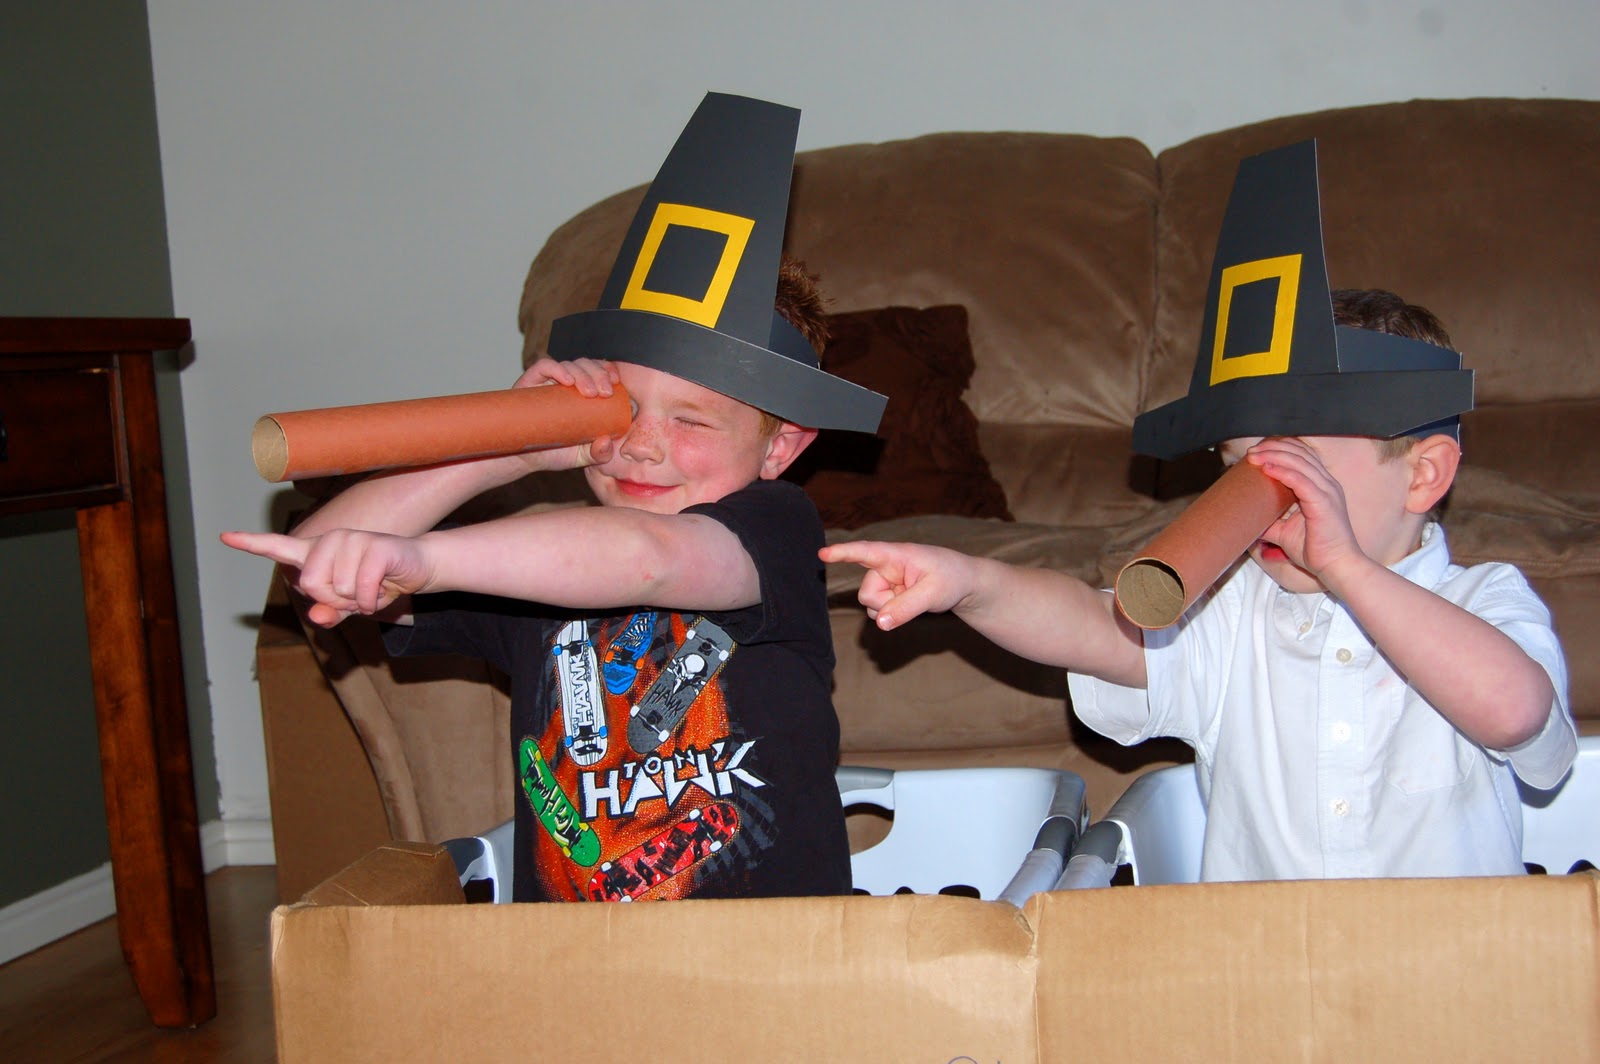
After reading our stories my pilgrims set out to sea on their long journey on the Mayflower...(I know you are all loving how I wrote Mayflower on the cardboard, hahaha!)
They got so hungry they even tried catching a small fish with their telescopes.

Finally they spot land far off in the distance...
After reaching land and starting to settle in they meet the cutest little Indians you ever did see...

The Pilgrims made friends with the Indians and the Indians showed the pilgrims how to plant corn and other seeds...

And after the garden had grown and was ready to harvest, they had a huge feast and gave thanks to God for all their blessings! I meant to pop popcorn with the kids to eat but the night got away from us. But we did make this adorable Indian Corn craft.

I cut out a corn cob shape out of yellow card stock paper and we used a pencil eraser to press on the corn kernels all over the cob. We made sure to use fall colored paint. The boys LOVED using the pencil eraser to paint with. Heck, even I did! :)

I cut out some corn husks from leftover scraps from our paper bag Indian vests. We crumbled them up and then straightened them out to give them some texture and glued them to the back of our corn. Andy was such a perfectionist and made sure his kernels were all close together so it looked "real" (as he said).

Next I lifted up the corn a little at the end, punched a hole in it with a hole punch, strung some raffia through it and made a bow. The raffia could act as a way to hang up the corn, or I just personally think it looks pretty. I got the idea for this craft at Spotted Canary.


Monday, November 14, 2011 0
