Monday, February 27, 2012

We picked up some books about Trains this past week at the library and after reading them we decided to embark on an adventure of making our very own train. My boys' main requirement was that it had to be a freight train so they could carry around some of their favorite toys in it.
I instantly thought of two empty Velveeta Cheese boxes that I had saved knowing someday I would have a use for them. I took the tops of the boxes off and put them together to make the front of the train and then used the cardboard bottoms as the box cars.

The boys picked out what colors they wanted and painted each of the pieces.

They also painted two clothespins black to use as the smoke stack for the train.

Connecting the train cars was the most difficult part of this project. I used black yarn to put them together.


Lastly we cut out some black circles for the wheels and Luke glued them around the train.

In some of the books we read, the freight cars had things written on them so Andy said he wanted me to write on the cars. They decided one of them should be for dinosaurs and one should be for Star Wars. You can also see I added some yellow detail on the freight cars for the boys too. Totally not needed, but Andy used to be a HUGE Thomas the Train fan and remembered those lines being on his old trains.


After it was all finished the boys had quite the Star Wars set up on he table. The bad guys were on top of the train, Anakin and Luke Skywalker were hiding in the freight car, and Obi-Wan and R2-D2 were in their ship on the sidelines as back up. My boys are so fun!


We also read Trains from the Heinemann first library collection. I picked out this book because I wanted my boys to learn about all the different types of trains throughout the world. I thought it was really educational for them and gave them a good understanding on how different types of trains worked.

Monday, February 27, 2012 0
Sunday, February 26, 2012
.JPG)
This pretty little lady has been getting over having croup this week. Let's just say it's been "one of those weeks". You know the kind where miraculously your body somehow finds a way to live on practically no sleep and still manages to function all day long. The kind where you will not find an ounce of patience left in yourself and the sound of "Mommy? Mommy?" almost drives you completely bonkers. Come on folks, we've all been there right?!
I may have completely lost my mind on Tuesday morning yelling at my husband for a reason I cannot even remember anymore (Wait a minute, it may have been Tuesday and Wednesday hahahaha!). This would definitely be the week that my husband deserves an award for finding a way to co-exist in the same house with me, and even in the same bed, for dealing with my complete lack of sanity as a result of Motherhood.
Can I show you something without you judging me? Andy brought home this assignment he did in class on his 100th day of school. The book was filled with the endings to words like ___ish ___at and he had to complete the word by writing the beginning.
.JPG)
I was really excited as I got scrolling through the book to see the words he had written and then I got to the __it column.... (#39 below)
.JPG)
It wasn't one of my most proud moments as a Mom. I was actually surprised he picked that word because the word I usually blurt out in haste would have started with Damn. Ha!
If I'm being honest with you, during weeks like this I usually find that I have to dig deep to find the joy in Motherhood. All I really wanted to do was snuggle in my bed and watch Cake Boss on Netflix and I could care less how messy the house was. I am really sounding terrible right about now, aren't I? The truth is, despite the **it incident, I can honestly say how much God loves me because he sent me this handsome young man. He was my saving grace this week.

This has been hanging on my fridge since Valentine's Day. Andy made it for me at school. "I love you because you make my dinner and lunch and breakfast."
.JPG)
Earlier this week they were using stamps in one of their centers and he brought this home for me. He even stamped the period with a heart. Awww...


Sunday, February 26, 2012 0
I have always wanted to create beautiful keepsake scrapbooks for my children but when it comes down to the craftiness of designing the pages, it's just not in my blood. I even have digital scrapbooking software but I've never been able to find my creative niche with it. I have come to realize that I am the type of person that needs it all laid out for me so that I can just insert the finishing touches. That is why Marianne Richmond's Daughter/Son Keepsake Books are perfect!


I wanted to tell you a little bit about Marianne's amazing story as well. She was diagnosed with a brain tumor (which thankfully was benign), but as she was recovering she spent her time creating hand-painted thank you cards for her well wishers. After a friend started selling some of her cards and they were a hit, Marianne and her husband started their own greeting card company. She now has an array of products and receives a lot of her inspiration from her four children every day.
I am soooo excited about completing my Dear Daughter Keepsake Book for Lila. Since she's so young I know it's going to be a work in progress that I will enjoy completing over the next couple of years.
GIVEAWAY:
The Organized Parent has been gracious in providing me with a Marianne Richmond Dear Son Keepsake Book to give away to one of my readers.
The Organized Parent is also offering all I Heart Crafty Things readers a 15% discount off select Marianne Richmond products through March 15, 2012. Her collection also includes Grandchildren and Mom's books (which would be a perfect Mother's Day Gift). To use this code, click on the banner in my right sidebar and use discount code 21699 at checkout.
HERE IS HOW TO WIN: Please make sure your email is on your profile, or include it with your comment. Only U.S. residents are eligible for this giveaway. (Big apologies to all my International readers!)
- Visit The Organized Parent and leave a comment telling me which Marianne Richmond product is your favorite.
- Follow I Heart Crafty Things via Google Friend Connect, Linky Followers, Facebook or Twitter and leave a comment on this post telling me where you follow.
- Like The Organized Parent on Facebook.
Giveaway will close Sunday, March 4, 2012 at 10:00 am MST!
***The Organized Parent provided me with a Marianne Richmond Dear Daughter Keepsake Book free of charge in exchange for reviewing their product, but all opinions are my own.
Wednesday, February 22, 2012

Hosted by Happy Go Lucky, I Heart Crafty Things,
Joy in the Jumble and Keeping Up With Kristi.
Each week we will choose one blog at random to spotlight at the next week's blog hop.
This weeks guest host is Measure Once, Cut Twice

There are no rules to this blog hop. Just link up your blog's main page. Then have fun reading new blogs and making new blog friends. We would love for you to follow the hostesses in the first four spots and our guest host in the fifth spot.
Please leave a comment so we know to follow you back.

Wednesday, February 22, 2012 0

A couple weekends ago it was Bald Eagle Day in Utah. There were five different locations throughout the State that you could go to view Bald Eagles. There were spotting scopes set up on Bald Eagles to get a good look and we arrived just in time to see a captive Eagle on display.

My Brother, Sis-in-Law and my Niece were able to come along with us so it made the trip extra fun!
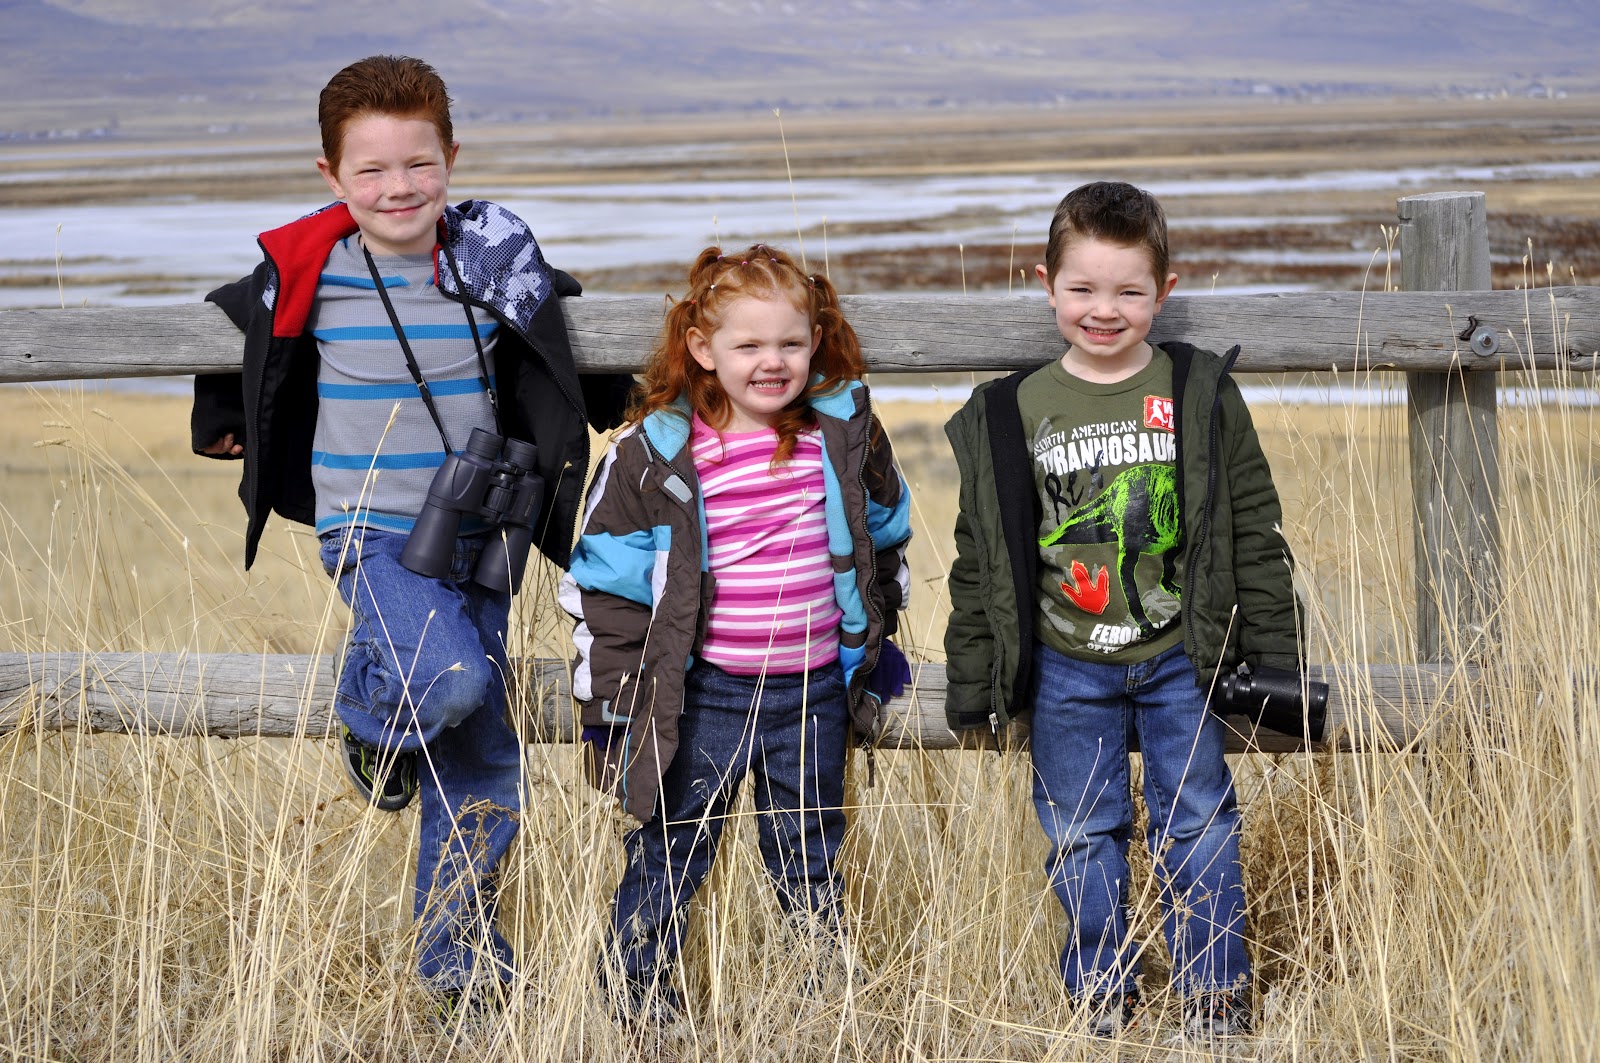
I didn't have the right zoom to capture good images but my Brother got some great pictures.
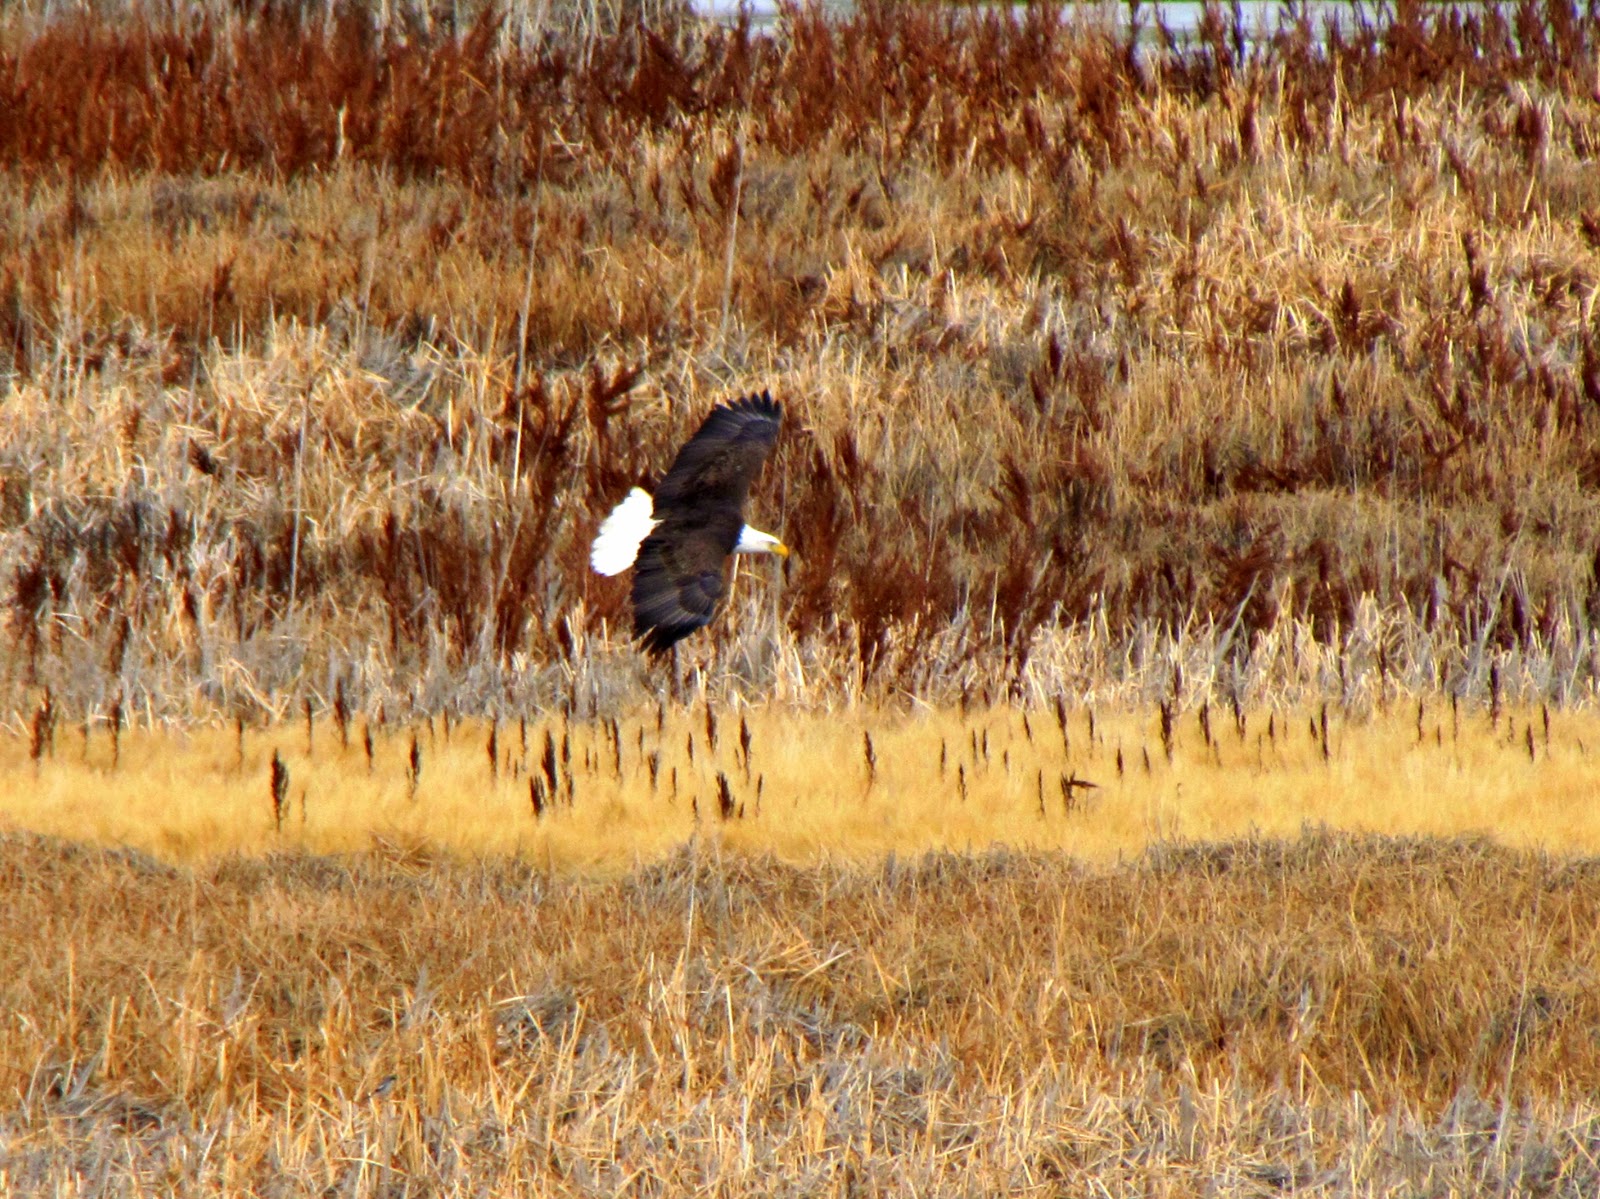
The Eagle landing in front (pictured below) was carrying a fish. Super cool!

Bald Eagle Day is a yearly event in Utah held in February, so you should definitely check it out next year if you live in the State. It's completely free and it gives children the opportunity to be out in nature.
I saw this great Bald Eagle craft from Craftprojectideas.com and knew it was just perfect to go along with Bald Eagle Day.

This project is so simple. You will need to purchase a small package of Kids Crafts brand white and brown feathers from Walmart and you'll need a piece of white, brown and yellow foam sheets.

You can find detailed directions on how to make the craft HERE, and to make it even simpler, I made a template for all the Bald Eagle pieces. You can print it off HERE.

We couldn't end our Bald Eagle fun without reading a story, now could we! We picked up Eaglet's World by Evelyn Minshull.

Happy Crafting!!
I like to link my posts up to THESE great link parties.
Saturday, February 18, 2012
Luke was sitting next to me while I was on Pinterest the other day (I know, I know, great Mother/Son bonding time, right?!). He saw this Walrus craft as I was browsing and he decided his life would not be complete if we didn't make it. After two days of non-stop bugging me and a trip to the library, we not only made this adorable craft, but we learned a lot about Walruses as well!

Isn't he cute? I traced the Pinterest link back to Danielle's Place of Crafts and Activities. Due to her Copyright Policy I can't give you a complete tutorial but you can find the directions for this craft on her Arctic Animal Page. (You have to scroll down the page a bit till you get to the Walrus craft.)
I did want to give you a couple tips if you decide to do this craft though. Danielle's directions say to glue the paper plates together. If you are inpatient like me and my boys, don't waste your time with school glue. Pop out the glue gun.
Also, we didn't glue in the tusks (plastic spoons) in the muzzle before we painted, as her directions said to. I knew painting would be messy for my preschooler, so we opted to glue on the muzzle and add the tusks after the Walrus was painted and dry. I used the glue gun for the tusks as well.
If I was going to do this craft with a class, I would probably have the paper plates all assembled, ready to paint to help with time. I think I would also consider using staples to put the paper plates together instead of glue. You wouldn't see the staples anyways once it is all painted.

I was disappointed that I could only find one children's picture book with a Walrus as the subject. Turns out, it was a wordless book too. If you know of any fiction Walrus books, I would love some suggestions for future use.


Happy Crafting!!
I like to link my posts up to THESE great link parties.
Saturday, February 18, 2012 0
Thursday, February 16, 2012
Hosted by Happy Go Lucky, I Heart Crafty Things,
Joy in the Jumble and Keeping Up With Kristi.
Each week we will choose one blog at random to spotlight at the next week's blog hop.
This weeks guest host is Smarty Pants Fun

There are no rules to this blog hop. Just link up your blog's main page. Then have fun reading new blogs and making new blog friends. We would love for you to follow the hostesses in the first four spots and our guest host in the fifth spot.
Thursday, February 16, 2012 0
Tuesday, February 14, 2012
Valentine's Activities--How much is a Heart Worth, Broken Heart Alphabet Matchching Game, Heart Art, Making Valentine's
Happy Valentine's Day!! We've been having fun the last week doing some Valentine-inspired activities. I thought I'd just do one post about them. I picked up Clifford's Valentines at the library and Andy read it to us. After reading about how Clifford made his big Valentine, we decided to make some of our own.

Every year we enjoy making Valentine's for Aunts and Uncles. This year I was inspired by a card I saw on Putti Prapancha. Here is the front of the card. Since we were making so many, we decided to just use a half sheet of paper for each Valentine to conserve paper.

I made a heart template that we laid over the card and we used a pencil eraser to stamp different colors into the heart shape.

When the heart was completely stamped, we took off the template and had a colorful heart on our card.

After making two cards, it was taking FOREVER so we decided to use our extra large pencil to make the stamps. It worked much better for us. The boys wrote an I and U on the side of the heart to complete the front of the card.

The boys took turns writing on the back of the cards. On a couple they wrote things they loved about their Aunt/Uncle. On others they wrote Happy Valentine's Day.

I was especially proud of Luke for how hard he worked writing on the back of the cards. For just turning 5 years old, he is doing really good at his writing.

We were also inspired by a fun idea from I Can Teach My Child using broken hearts to make an alphabet matching game. I made a template of hearts in which each heart contained the capital letter on the left side and lowercase on the right side. After cutting out each heart, I cut a zig-zag line through the middle to make it a puzzle.

We laid all the capital letters out on the table while keeping the lowercase letters in a pile to the left. Luke took the top lowercase letter on the pile and matched it up with the capital letter. I put my template in a PowerPoint document which you can download HERE. I was worried it looked a little distoted so if you want each individual page in PDF format I can email them to you, just leave your email address in a comment below.

We also worked on Math with this What's a Heart Worth worksheet I found at Mrs. Wheeler's First Grade Tidbits. You can stop by her website to download the worksheet and check out more of her fun ideas. I picked up the little hearts in the Target dollar section and labeled each one with numbers 1-9. For my preschooler I filled each heart with a different number of pennies for him to count. For my first grader I filled them with pennies, nickles, dimes and quarters for him to count.

After counting the coins in a heart, they recorded the amount on the worksheet in the corresponding box.

We also read about the history of Valentine's Day by reading Valentine's Day by Kathryn A. Imler. If I'm being completely honest, I don't think my kids really care about why we have Valentine's Day, but I certainly learned a lot. :)
We finished off our Valentine's week by making some abstract Valentine's Art. We used our dollar section Target hearts again as a heart stamp and pressed them all over a sheet of paper in red and pink.

While the paint was still wet, Luke sprinkled red and pink glitter all over the hearts.

After dumping off the excess glitter, we used the leftover red and pink paint and an old toothbrush to splatter some paint all over the paper. It looks so pretty glued onto a red background.

I know it's hard to see how pretty the glitter looks in a picture, but it's vibrant and beautiful!

Hope you have a Happy Valentine's Day!!
Happy Crating!
Tuesday, February 14, 2012 0
