Tuesday, January 31, 2012
This Giveaway is now closed.
Congratulations to Tonii, Comment #1, who is the winner of the Sleeper Peeper Mask!

It seems like at least every other day my boys end up with a bump or bruise on their head or some other place on their body and I often find myself running to the freezer looking for a frozen bag of peas for them to hold on it. Does this sound familiar?? And let's not get started on how much of a fight it is to get them to actually hold the peas on the bump. Let's face it...it ain't pretty!

But wait, the best part...put it in sunlight for a couple of hours and it gently glows in the dark. What kid doesn't love glow in the dark objects? Look at all of their cute styles and they are so affordable at only $4.95 each.

GIVEAWAY:
Streamline makes several other fun and useful products as well. The Organized Parent has provided me with a Sleeper Peeper Eye Mask to give away to one I Heart Crafty Things reader.


The Organized Parent is offering all I Heart Crafty Things readers a 15% discount on all Streamline products through February 15, 2012. This is an amazing discount considering how affordable their products already are. To use this discount, click on the banner in my ride sidebar and use discount code 21649 at checkout.
HERE IS HOW TO WIN: Please make sure your email is on your profile, or include it with your comment. Only U.S. residents are eligible for this giveaway (Big apologies to all my International readers!).
- Follow I Heart Crafty Things via Google Friend Connect, Facebook or Twitter and leave a comment on this post telling me which Sleeper Peeper Mask style is your favorite.
- For an extra entry: Like The Organized Parent on Facebook. (Make sure you leave a separate comment for this extra entry.)
Giveaway will close Monday, February 6, 2012 at 10:00 am MST!
***The Organized Parent provided me with a Jelly Pals Ice Pack free of charge in exchange for reviewing their product, but all opinions are my own.
Tuesday, January 31, 2012 0
In honor of Groundhog Day on Thursday, we made Paper Plate Groundhogs yesterday. Technically I think they could pass for Beavers also, but they all pretty much look the same, right?! :-)

Materials You Will Need:
Paper Plate
Brown Acrylic Paint
2 Large Wiggly Eyes
Black Marker
Ears, Nose and Teeth pieces (pattern found HERE)
Craft Knife (Used by Parent, obviously!)
6 Toothpicks
Directions:
We started by painting the bottom of a paper plate with brown acrylic paint.

When the paper plate was completely dry, we started assembling it together. I free handed the ears, nose and teeth for the groundhog and made a pattern you can print off HERE. The nose will need to be on black card stock paper, ears on brown paper and teeth on white paper.
First, attach the black nose in the center of the paper plate. Then, glue on the wiggly eyes. Our wiggly eyes were graciously given to us by Craftprojectideas.com and they can be purchased at your local Walmart. Next, glue the ears to the back of the paper plate.

I used a black permanent marker to draw the mouth on the paper plates for my boys. Then I used a craft knife to cute a slit in each side of the mouth for the teeth to go in. Put glue at the top of the teeth and slide them through the slits. Press down on the mouth on top of the teeth to make sure they are securely in place.

Here is a picture of the mouth after I had cut the slits with the craft knife.
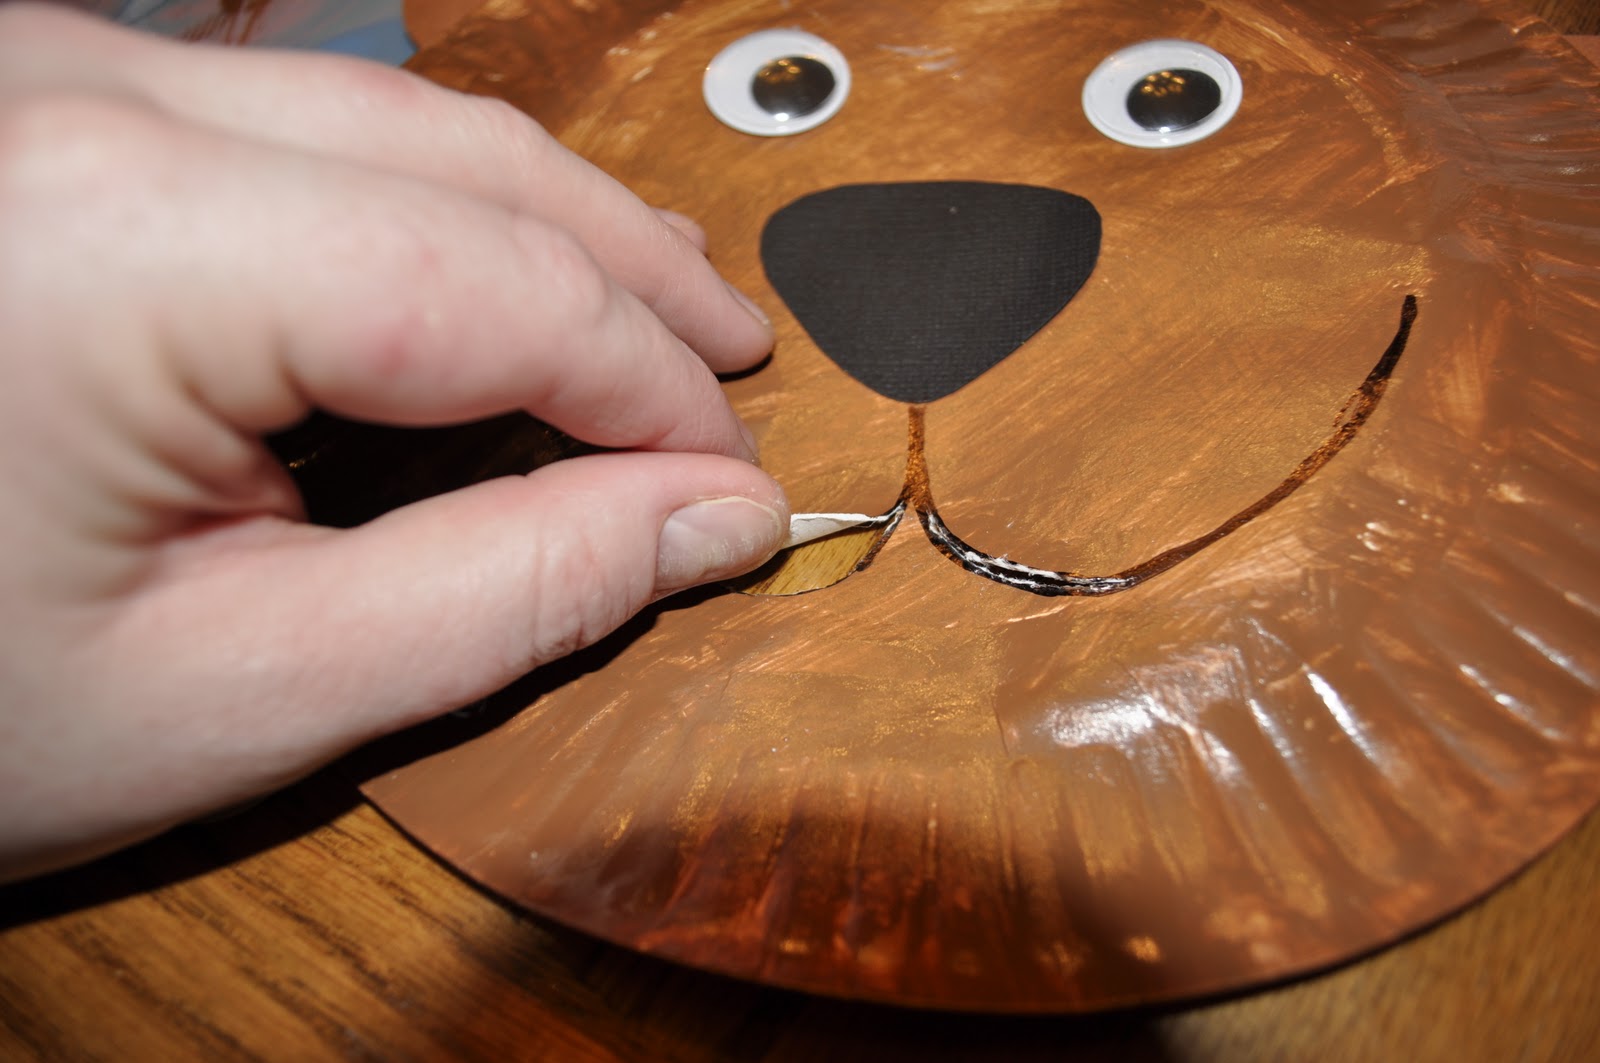
After the teeth were in place, the boys used the black marker to draw on eyebrows, make a line in the ears, and add hair between the eyebrows.

The final touch is adding 3 toothpicks on each side of the nose for the whiskers. If you have the flat toothpicks they are better, but since all I had was the round pokey ones, I just cut the ends off so they weren't dangerous for the kids.

He sure is a cute little guy! Let's hope he blesses us with an early Spring on Thursday. :-)
Happy Crafting!!
I like to link my posts up to THESE fun link parties.
Wednesday, January 25, 2012
It's Time to Mingle!

Hosted by Happy Go Lucky, I Heart Crafty Things,
Joy in the Jumble and Keeping Up With Kristi.
Each week we will choose one blog at random to spotlight at the next week's blog hop.
This weeks guest host and winner of the our giveaway from last week is Someone in Mind

There are no rules to this blog hop. Just link up your blog's main page. Then have fun reading new blogs and making new blog friends. We would love for you to follow the hostesses in the first four spots and our guest host in the fifth spot. Please leave a comment so we know to follow you back.
Grab our button if you want to share our blog hop with others. There will be a new list every Thursday, so be sure to come back every week. Also, if you are interested in hosting a giveaway for our blog, please email any one of us. We would love to have you!! 
We hope you have fun and thanks for joining us! We are so excited to find new blogs, share great ideas, and inspire each other.
Hosted by Happy Go Lucky, I Heart Crafty Things,
Joy in the Jumble and Keeping Up With Kristi.
Each week we will choose one blog at random to spotlight at the next week's blog hop.
This weeks guest host and winner of the our giveaway from last week is Someone in Mind

Wednesday, January 25, 2012 0
Tuesday, January 24, 2012
I don't know if my house has ever been in such a state of chaos...I thought about tackling it yesterday but after I saw this idea on No Time For Flashcards, I decided it would be more fun to make Chinese New Years Dragons. hahaha :)

We made a much smaller version of the craft and instead of making it a combined family craft, each of my boys completed their own. We used bubble wrap to paint the dragons. Love this technique. It is so fun and fast!

Since I decided to add feet to the dragons, I ended up having to cut them out for the boys after the paint was dry. We cut out different colored triangles to add spikes to the dragons. We also added a googly eye to him and finished him off with crinkled red and orange tissue paper glued to the back of his mouth for the fire. They turned out super cute! If you are interest in making this craft, I saved my dragon pattern and you can find it HERE.

The best part about this craft was that knowing the Chinese New Year was coming up, I picked up some dragon books at our trip to the library last week.
Max's Dragon Shirt by Rosemary Wells

Dragon Dancing by Carole Lexa Schaefer

Life-Size Dragons by John Grant

Happy Crafting!!
I like to link my posts up to THESE fun link parties.
Tuesday, January 24, 2012 0
Sunday, January 22, 2012

Have you read this fun book? It is about a girl who really loves to eat Lima Beans, but since someone told her that was uncool, she decided she needed to stop eating them. One day she woke up in the morning with a bad case of stripes (see the cover of the book). She has not fever or other symptoms other than the stripes so she is sent back to school the next day. Every time someone in her class says some type of pattern her skin changes to it. After specialists visit her and no one knows how to cure her, an old lady shows up with the cure--to eat Lima Beans. The girl soon discovers she shouldn't fret over what others think, she should just be happy being herself.
After reading this story I thought it would be so fun for my boys to pictures themselves having a bad case of stripes. I found a picture of them from this past Summer wearing shorts and faded it using the Sketch option in Picnik. This way the skin became more white and would be easy to color. My boys got out their colored pencils and colored themselves a good case of the stripes. It was so much fun!
Oh, and in case you were wondering, I couldn't resist but get in on the good fun. Here is my completed picture of the boys. :)

Andy's Picture

Luke's picture

Happy Crafting!!
I like to link my posts up to THESE fun link parties.
Sunday, January 22, 2012 0
Thursday, January 19, 2012
It's Time to Mingle!
Hosted by Happy Go Lucky, I Heart Crafty Things,
Joy in the Jumble and Keeping Up With Kristi.
Each week we will choose one blog at random to spotlight at the next week's blog hop.
This weeks guest host is Posy the Porcelain Pig
There are no rules to this blog hop. Just link up your blog's main page. Then have fun reading new blogs and making new blog friends. We would love for you to follow the hostesses in the first four spots and our guest host in the fifth spot. We always follow back!!
Please leave a comment so we know to follow you back! This week we have a special surprise for you!! Kristi is sponsoring a FABULOUS giveaway. She will be giving away a copy of the book Heaven is For Real by Todd Burpo to one lucky blog who links up and follows all 5 co-hosts. I've been wanting to read this book!
So happy blog hopping! We hope you have fun with us!!

Grab our button if you want to share our blog hop with others. There will be a new list every Thursday, so be sure to come back every week. Also, if you are interested in hosting a giveaway for our blog, please email any one of us. We would love to have you!!
Hosted by Happy Go Lucky, I Heart Crafty Things,
Joy in the Jumble and Keeping Up With Kristi.
Each week we will choose one blog at random to spotlight at the next week's blog hop.
This weeks guest host is Posy the Porcelain Pig
There are no rules to this blog hop. Just link up your blog's main page. Then have fun reading new blogs and making new blog friends. We would love for you to follow the hostesses in the first four spots and our guest host in the fifth spot. We always follow back!!

We hope you have fun and thanks for joining us! We are so excited to find new blogs, share great ideas, and inspire each other.
Thursday, January 19, 2012 0
Wednesday, January 18, 2012

I am so excited to show you my Valentine's Monster Box today. I made some for my boys a couple years ago (which we still use each year) and decided it was time to make one for Lila this year. Here are pictures of my boys Valentine's Monster Boxes.


I started out with an empty shoe box, cut a rectangle hole in the top for the mouth, and then completely covered the outside of it with felt. I used a gluegun to attach the felt to the box.

Her is the underside of my lid. I wrapped my felt underneath the mouth and glued it so you couldn't see any edges of the box peeking through.

To make the fur on the monster you will need to buy a roll of Fun Fur. I got mine at Walmart in the yarn section but I've seen it at Michael's too. They have lots of different colors to choose from. I picked a striped pattern for Lila's box.

I used a glue gun to attach the Fun Fur to the box. I wrapped my Fun Fur over the top of the box, while adding a dab of glue at each end as I wrapped it. After I had made several rows, I lifted up the Fun Fur and put a line of glue down on the felt underneath it to hold it in place more. I usually put a row of glue in the middle and one on each end. Hope that makes sense.

(Yes, that is a Pineapple in my picture next to my juicer. Can't wait to make me some fresh orange and pineapple juice. haha)
When you get to the opening in the mouth, go ahead and keep wrapping the Fun Fur along the left side of the mouth and down the rest of the box, and then go back and do the right side of the mouth. You can see in the picture below what I mean.

After putting Fun Fur over the top of the box, I went around each side of the lid and did the same thing. After you are done adding the Fun Fur, it is time to add all the Monster features.
I started with the eyes. Glue down 2 extra large pom-poms for the eyes with a large googly eye in each. Then add a medium sized pom-pom for the nose.

I have to say that my most favorite feature of this Monster box is definitely the jeweled eyelashes. Aren't they adorable???!! LOL Craftprojectideas has the cutest package of Heart Acrylic Jewels at Walmart and that is what I used. For my boys' boxes I used the same exact jewels, but Luke's had flower jewels instead of hearts. I simply hot glued the jewels along the top of the eyes to make eyelashes.

I also curled two pipecleaners around two fingers and then glued them on the side of the eyes to make fun antennae.

Then I cut out teeth and a tongue out of white and red felt and glued them around the Monster's mouth.

To finish the box I used glitter glue to write "Feed Me" on the front of the box and glued on some more heart jewels. On the boys' boxes I used foam stickers but I didn't have any so I improvised. On Luke's it said "I'm Hungry" instead of "Feed Me".

These boxes have held up sooooo good! This will be our third year using my boys'. We usually have to form the antennae again, but other than that, they are like new. And did I mention how much my kids LOVE them?!! They are so cute!
We are trying to eat healthier around our house so this year I think I'm going to start a week or two before Valentine's Day and feed their Monster's sweet notes telling them how I'm proud of them or what I love about them. If you make these I would love to hear about it.
Happy Crafting!
I like to link my posts up to these fun link parties.
Wednesday, January 18, 2012 0
Tuesday, January 17, 2012

My boys love crocodiles! I was so excited when Luke picked out Lyle, Lyle Crocodile from the Library so we could make a crocodile craft. We decided to read a couple more stories and spend the week learning about alligators and crocodiles.

Alberto the Dancing Alligator by Richard Waring.

We also enjoyed some non-fiction reading, Alligators and Crocodiles from the Zoobooks series.

Our crocodile craft was inspired from a craft by Relentlessly Fun, Deceptively Educational. They used a painting technique to make scales on the reptiles with a shower poof and I just had to give it a try.

To make our crocodile I found the perfect pattern HERE which you can print off on card stock paper. The pattern only came with one leg, so you will have to trace another leg onto the paper for the crocodile.

We started out by painting the pattern green with water colors. I was worried some white would show through when we painted the crocodile, that's why we did this step. However, I'm not so sure it was really necessary. You will see why in the next step.

To finish painting the crocodile, take a shower poof and rip a large strip out of it.

Lay the netting over the crocodile pattern and dab paint over it to make a scale texture.

As my kids got to dabbing I started realizing the netting worked better if you lightly dabbed it with paint. I was worried that by my kids using lots of paint, the texture wouldn't show through, but as you can see in the picture below, it did. You can also see how unnecessary the water coloring was.

After the paint is completely dry, cut out all the crocodile pieces.

We attached the tail to the crocodile body with a metal brad. This way the kids can move the tail around.

Next I hot glued two clothespins to the back of the crocodile so he would be able to stand up.

Glue the feet to the front of the clothespins and your crocodile is complete.

My boys just love how these stand up so they are easier to play with. It's fun to make crafts and art to display, but even more fun sometimes is to make crafts that the kids are free to play with as they may.
Happy Crafting!!
I like to link my posts up to THESE fun link parties.
Tuesday, January 17, 2012 0
Subscribe to:
Posts (Atom)
